We outline the basic first aid training techniques and procedures that underpin care. including moving a casualty and applying dressings and bandages. Usually, a primary aider isn’t expected to maneuver an injured person, but in some circumstances like when a casualty is in immediate danger, it’s going to be necessary. The key principles for moving casualties are described here. Information is additionally given on making an assessment of the risks involved in moving a casualty or assisting a casualty to safety.
What is Basic first aid training?
A guide to the basic first aid training, equipment and materials commonly found during a care kit is given, with information on how and when to use them. Applying dressings and bandages effectively is an important part of first aid: wounds usually require a dressing, and most injuries enjoy the support that bandages can give.
What are the main aims of Basic first aid training?
AIMS AND OBJECTIVES
- To assess the casualty’s condition.
- To comfort and reassure the casualty.
- To maintain a casualty’s privacy and dignity.
- To use a first-aid technique relevant to the injury.
- To use dressings and bandages as needed.
- To apply good handling techniques if moving a casualty.
- To obtain appropriate help: call 999/1 12 for emergency help if you suspect serious injury or illness.
First aid training – How to remove in casualty for First Aider.
To make a radical examination of a casualty, obtain an accurate diagnosis or give treatment, you’ll need to remove a number of his clothing. this could be through with the minimum of disturbance to the casualty and together with his agreement if possible. Remove as little clothing as possible and don’t damage clothing unless it’s necessary. If you would like to chop a garment, attempt to cut along the seams, keeping the clothing beyond the casualty’s injury. Maintain the casualty’s privacy and stop exposure to cold. Stop if removing clothing increases the casualty’s discomfort or pain.
HOW TO REMOVING CLOTHING IN LOWER BODY INJURIES?
SHOES

Untie any laces, support the ankle and carefully pull the shoe Off by the heel. To remove long boots, you may need to cut them down the back seam.
SOCKS

Untie any laces, support the ankle and carefully pull the shoe Off by the heel. To remove long boots, you may need to cut them down the back seam.
TROUSERS
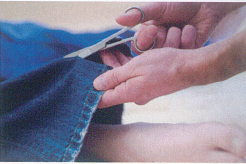
Gently pull up the trouser leg to expose the calf and knee or pull down from the waist. If you need to cut clothing, lift it clear of the casualty’s injury.
HOW TO REMOVING CLOTHING IN UPPER BODY INJURIES?
JACKETS

Support the injured arm. Undo any fastenings on the jacket and gently pull the garment off the casualty’s shoulders. Remove the arm on the uninjured side from its sleeve. Pull the garment round to the injured side of the body and ease it off the injured arm.
SWEATERS AND SWEATSHIRTS

With clothing that cannot be unfastened, begin by easing the arm on the uninjured side out of its sleeve. Next, roll up the garment and stretch it over the casualty’s head. Finally. slip off the other sleeve of the garment, taking care not to disturb her arm on the injured side.
REMOVING HEADGEAR
Protective headgear. such as a riding hat or a motorcyclist’s crash helmet, is best left on; it should be removed only if absolutely necessary, for example, if you cannot maintain an open airway. If the item does need to be removed. the casualty should do this herself if possible, otherwise, you and a helper should remove it. Take care to support the head and neck a: all times and keep the head aligned with the spine.
CAUTION – Do not remove a helmet unless absolutely necessary.
REMOVING AN OPEN-FACE OR RIDING HELMET.
- Undo or cut through the chinstrap. Support the casualty’s head and neck, keeping them aligned with the spine. Hold the lower jaw with one hand and support the neck with the other hand.

2. Ask a helper to grip the sides of the helmet and pull them apart to take the pressure off the head, then lift the helmet upwards and backward.
REMOVING A FULL-FACE HELMET.

- Undo or cut the straps. Working from the base of the helmet, ease your fingers underneath the rim. Support the back of the neck with one hand and hold the lower jaw firmly. Ask a helper to hold the helmet with both hands.

2. Continue to support the casualty’s neck and lower jaw. Ask your helper, working from above, to tilt the helmet backward (without moving the head) and gently lift the front Of the helmet clear of the casualty’s chin.
3. Maintain support on the head and neck. Ask your helper to tilt the helmet forward slightly so that it will pass over the base of the skull, and then lift it straight off the casualty’s head.
How do you handle casualty?
When giving first aid you should leave a casualty in the position in which you find him until medical help arrives. Only move him if he is in imminent danger. and even then only if it is safe for you to approach and you have the training and equipment to carry out the move. A casualty should be moved quickly if he is in imminent danger.
Examples: –
- Drowning.
- Fire or he is in an area that is filling with smoke.
- Explosion or gunfire.
- A collapsing building or other structure.
CAUTION:-
- Do not approach a casualty if doing so puts your own life in danger.
- Do not move a casualty unless there is an emergency situation that demands you take immediate action.
ASSESSING THE RISK OF MOVING A CASUALTY.
If it is necessary to move a casualty, consider the following before you start.
- Is the task necessary? Usually, the casualty can be assessed and treated in
the position in which you find him. - What are his injuries or conditions, and will a move make them worse?
- Can the casualty move? Ask the casualty if he feels able to move.
- The weight and size of the casualty.
- Can anyone help? If so, are you and any helpers trained and physically fit?
- Will you need protective equipment to enter the area, and do you have it?
- Is there any equipment available to assist with moving the casualty and are you trained to use it?
- Is there enough space around the casualty to move him safely?
- What sort of ground will you be crossing?
ASSISTING A CASUALTY SAFELY
If you need to move a casualty, take the following steps to ensure safety.
- Select a method relevant to the situation, the casualty’s condition, and the help and equipment that is available.
- Use a team. Appoint one person to coordinate the move and make sure that the team understands exactly what to do.
- Plan your move carefully and make sure that everyone is prepared.
- Prepare any equipment and make sure that the team and equipment are in position.
- Use the correct technique to avoid injuring the casualty, yourself, or any helpers.
- Ensure the safety and comfort of the casualty, yourself, and any helpers.
- Always explain to the casualty what is happening, and encourage him to cooperate as much as possible.
- Position yourself as close as possible to the casualty’s body.
- Adopt a stable base, with your feet shoulder-width apart. so that you remain well balanced and maintain good posture at all times during the procedure.
- Use the strongest muscles in your legs and arms to power the move. Bend your knees.
What are the first aid materials and their uses?
All workplaces, leisure centers, homes, and cars should have first aid kits. The first aid kits for workplaces or public places must conform to legal requirements and be clearly marked in a green box with a white cross and easily accessible. For home or the car, you can either buy a kit or put together first aid items yourself and keep them clean. waterproof container. Any first aid kit must be kept in a dry place and checked and replenished regularly. The items on these pages form the basis of a first aid kit for the home. You may wish to add pain-relief tablets such as paracetamol.
STERILE DRESSINGS – WOUND DRESSINGS
The most useful dressings consist of a dressing pad attached to a roller bandage and are sealed in a protective wrapping.

They are easy to apply, so are ideal in an emergency. Various sizes are available. Individual sterile dressing pads are also available that can be secured with tape or bandages.

ADHESIVE DRESSINGS – OR PLASTERS
These are applied to small cuts and grazes and are made of fabric cr waterproof plastic. Use hypoallergenic plasters for anyone who is allergic to the adhesive in regular ones. People who work with food are required to use blue plasters. Special gel plasters can protect blisters.

BANDAGES ROLLER BANDAGES
These items are used to give support to injured joints, secure dressings in place, maintain pressure on wounds and limit swelling.

TRIANGULAR BANDAGES

Made of cloth, these items can be used folded as bandages or slings. If they are sterile and individually wrapped. they may also be used as dressings for large wounds and burns.
GAUZE TUBULAR BANDAGES

Gauze tubular bandages are used with an applicator to secure dressings on fingers and toes. Elasticated tubular bandages are sometimes used to support injured joints such as the knee or elbow.
FIRST AID BASIC PROTECTIVE ITEMS
DISPOSABLE GLOVES

Wear gloves, if available, whenever you dress wounds or when you handle body fluids or other waste materials. Use Latex-free gloves because some people are allergic to latex.
PROTECTION FROM INFECTION IN CPR

You can use a plastic face shield or a pocket mask to protect you and the casualty from cross infections when giving rescue breaths.
ADDITIONAL ITEMS
CLEANSING WIPES – Alcohol-free wipes can be used to clean skin around wounds.

GAUZE PADS – Use these pads as dressings, as padding, or as swabs to clean around wounds.

ADHESIVE TAPE – Use tape to secure dressings or the loose ends of bandages. If the casualty is allergic to the adhesive on the tape. use hypoallergenic tape.

SCISSORS, SHEARS, AND TWEEZERS – Choose items that are blunt-ended so that they will not cause injuries. Use shears to cut clothing.

OTHRES

Kitchen film or clean plastic bags can be used to dress burns and scalds. Non-stick dressings can be kept for larger wounds. Keep alcohol gel to clean your hands when no water is available.
FOR USE OUTDOORS – A blanket can protect a casualty from cold. Survival bags are very compact and will keep a person warm and dry in an emergency. A torch helps visibility, and a whistle can be Used to summon help.

BASIC MATERIALS FOR A GENERAL FIRST AID KIT
- Easily identifiable watertight box
- 20 adhesive dressings (plasters) in assorted sizes
- Six medium sterile dressings
- Two large sterile dressings
- One sterile eye pad
- Six triangular bandages
- Six safety pins
- Disposable gloves
- Two roller bandages
- Scissors
- Tweezers
- Alcohol-free wound cleansing wipes
- Adhesive tape
- Plastic Face shield or pocket mask
- Notepad and pencil
- Alcohol gel
- Other useful items:
- Blanket, survival bag, torch, whistle
- Warning triangle and high visibility jacket to keep in the car
HOW TO DRESSING DRESSINGS
You should always cover a wound with a dressing because this helps to prevent infection. With severe bleeding, dressings are used to help the blood-clotting process by exerting pressure on the wound.
Use a pre-packed sterile wound dressing with a bandage attached (apposite) whenever possible. If no such dressing is available. use a sterile pad. Alternatively, any clean, non-fluffy material can be used to improvise a dressing. Protect small cuts with an adhesive dressing.
RULES FOR USING DRESSINGS
When handling or applying a dressing, there are a number of rules to follow. These enable you to apply dressings correctly, they also protect the casualty and yourself from cross-infection.
- Always wear disposable gloves, if these are available, before handling
any dressing. - Cover the wound with a dressing that extends beyond the wound’s edges.
- Hold the edge of the dressing, keeping your fingers well away from the area that will be in contact with the wound.
- Place the dressing directly on top of the wound; do not slide it on from the side.
- Remove and replace any dressing that slips out of position.
- If you only have one sterile dressing, use this to cover the wound, and put other clean materials on top of it.
- If blood seeps through the dressing, do not remove it, instead, place another dressing over the top. If blood seeps through the second dressing, remove both dressings completely and then apply a fresh dressing, making sure that you put pressure on the bleeding point.
- After treating a wound, dispose of gloves, used dressings, and soiled items in a suitable plastic bag, such as a yellow biohazard bag (below). Keep disposable gloves on until you have finished handling any materials that may be contaminated, then put them in the bag.

HOW TO APPLY A STERILE WOUND DRESSING
This type of dressing consists of a dressing pad attached to a roller bandage. The pad is a piece of gauze backed by a layer of cotton wool or padding. Sterile dressings are available individually wrapped in various sizes. They are sealed in protective wrappings to keep them sterile. Once the seal or this type of dressing has been broken, the dressing is no longer sterile.
- Break the seal and remove the wrapping. Unwind some of the bandages, taking care not to drop the roll or touch the dressing pad.
2. Unfold the dressing pad, and lay it directly on the wound. Hold the bandage on each side of the pad as you place it over the wound.

3. Wind the short end of the bandage once around the limb and the pad to secure the dressing.

4. Wind the other end (head) of the bandage around the limb to cover the whole pad. Leave the short end of the bandage hanging free.

5. To secure the bandage, tie the ends in a reef knot (p.250). Tie the knot directly over the pad to maintain firm pressure on the wound.

6. Once you have secured the bandage, check the circulation in the limb beyond it. Loosen the bandage if it is too tight, then reapply. Recheck every ten minutes.
STERILE PAD AND GAUZE DRESSINGS
If there is no sterile wound dressing with a bandage available, use a sterile pad or make a pad with pieces of gauze. Make sure the pad is large enough to extend well beyond the edges of the wound. Hold the dressing face down; never touch the part of the dressing that will be in contact with a wound. Secure the dressing with tape. f you need to maintain pressure to control bleeding. use a bandage.
- If Holding the dressing or pad by the edges, place it directly on to the wound.

2. Secure the pad with adhesive tape or a roller bandage.
IMPROVISED DRESSINGS
If you have suitable dressings, any clean non-fluffy material can be used in an emergency. If using a piece of folded cloth, hold it by its edges, unfold it, then refold it so that the clean inner side can. be placed against the wound.

ADHESIVE DRESSINGS
Plasters are useful for dressing small cuts and grazes. They consist of a gauze 0″ cellulose pad and an adhesive backing. and are often wrapped singly in sterile packs. There are several sizes available, as well as special shapes for use on fingertips, heels, and elbows; some types are waterproof, Blister plasters have an oval cushioned pad, People who work with food must cover any wounds with visible, blue, waterproof plasters.
- Clean and dry the skin around the wound. Unwrap the plaster and hold it by the protective strips over the backing, with the pad side facing downwards.
2. Peel back the strips to expose the pad, but do not remove them. Without touching the pad surface. place the pad on the wound.

3. Carefully pull away the protective strips, then press the edges of the plaster down.
COLD COMPRESSES
Cooling an injury such as a bruise or sprain can reduce swelling and pain. There are two types of compress: cold pads, which are made from material dampened with cold water, and ice packs. An ice pack can be made using ice cubes (or packs of frozen peas or other small vegetables) wrapped in a dry cloth.
COLD PAD
- Soak a clean flannel or towel in cold water. Wring it out lightly and fold it into a pad. Hold it firmly against the injury (right).
- Re-soak the pad in cold water every few minutes to keep it cold. Cool the injury for at least ten minutes.
ICE PACK
- Partly fill a plastic bag with small ice cubes or crushed ice. or use a pack of frozen vegetables. Wrap the bag in a dry cloth.
- Hold the pack firmly on the area. Cool for ten minutes, topping up the ice as needed.
PRINCIPLES OF BANDAGING
There are a number of different first aid uses for bandages: they can be used to secure dressings, control bleeding, support and immobilize limbs and reduce swelling in an injured limb. There are three main types of bandages. Roller bandages secure dressings and support injured limbs. Tubular bandages hold dressings on fingers or toes. or support injured joints. Triangular bandages can be used as large dressings, as slings, to secure dressings, or to immobilize limbs.
If you have no bandage available, you can improvise from everyday items; for example, you can fold a square of fabric, such as a headscarf, diagonally to make a triangular bandage.
RULES FOR APPLYING A BANDAGE

- Reassure the casualty before applying a bandage and explain clearly what you are going to do.
- Help the casualty to sit or lie down in a comfortable position.
- Support the injured part of the body while you are working on it. Ask the casualty or a helper to do this.
- Work from the front of the casualty, and from the injured side where possible.
- Pass the bandages through the body’s natural hollows at the ankles. knees, waist, and neck, then slide them into position by easing them back and forth under the body.
- Apply bandages firmly, but not so tightly that they interfere with circulation to the area beyond the bandage.
- Fingers or toes should be left exposed, if possible so that you can check the circulation afterward.
- Use reef knots to tie bandages. Ensure that the knots do not cause discomfort, and do not tie the knot over a bony area. Tuck loose ends under a knot if possible, to provide additional padding.
- Check the circulation in the area beyond the bandage every ten minutes
- once it is secure. If necessary, unroll the bandage until the blood supply returns, and reapply it more loosely.
IMMOBILISING A LIMB

When applying bandages to immobilize a limb you also need to use soft, bulky material, such as towels or clothing, as padding. Place the padding between the legs, or between an arm and the body, so that the bandaging does not displace broken bones or press bony areas against each Other. Use folded triangular bandages and tie them at intervals along the limb, avoiding the injury site. Secure with reef knots tied on the uninjured side. If both sides of the body are injured, tie knots in the middle of where there is the least chance of causing further damage.
CHECKING CIRCULATION AFTER BANDAGING
When bandaging a limb or using a sling, you must check the circulation in the hand or foot immediately after you have finished bandaging, and every ten minutes thereafter. These checks are essential because limbs swell after an injury, and a bandage can rapidly become too tight and interfere with blood circulation to the area beyond it The symptoms of impaired circulation change as first the veins and then the arteries become constricted.
RECOGNITION
- If circulation is impaired
- there may be.
- A swollen and congested
- Blue skin with prominent veins,
- A feeling that the skin is painfully distended Later there may be:
- Pale. waxy skin;
- Skin cold to touch,
- Numbness and tingling followed by severe pain:
- Inability to move affected fingers or toes.


Summary
It’s important to guard yourself against contagious illnesses and other hazards when providing care. to assist protect yourself:
- Always check for hazards that would put your safety in danger before approaching a sick or injured person.
- Avoid direct contact with blood, vomit, and other bodily fluids.
Wear protective equipment, like nitrile or vinyl gloves when treating someone with an open wound or a breathing barrier when performing rescue breathing. Wash your hands with soap and water immediately after providing care.
In many cases, basic care can help stop a minor situation from getting worse. within the case of a medical emergency, care might even save a life. If someone features a serious injury or illness, they ought to receive follow-up care from a medical professional.